Quick answer
Measure in a fixed order: confirm the scope and reference origin, close the room loop, record clear openings and heights, trace every truck-to-room route segment, locate fixed interfaces, measure furniture and its operating envelope, label photographs and exceptions, then run a second-person check. Use the downloadable field checklist so an unverified value never looks measured.
On this page10 sections
Measure in this order and leave with a complete field packet
Use the same sequence in every room so omissions are visible before you leave the site. A preliminary survey can stop with clearly labeled unknowns; a quote or release survey needs the confidence, evidence and review status required by that decision.
-
Confirm scope and origin
Name the building, floor and rooms; mark included and excluded areas; choose stable reference faces; and state units, rounding and evidence-status labels.
-
Close the room shell
Measure the wall loop from consistent finished faces, locate jogs and columns, and add an overall or diagonal check that can expose an out-of-square condition.
-
Record every usable opening
Measure clear width and height in the operating condition, then note threshold, closer, leaf swing, approach and adjacent obstructions.
-
Trace the complete delivery route
Follow the actual arrival point through dock or grade entry, security, corridors, turns, elevator, staging and the final room entry; record each segment and transition.
-
Check vertical limits
Record finished ceiling height plus lower soffits, beams, doors, lights, diffusers, sprinklers and other overhead restrictions along the room and route.
-
Locate fixed interfaces
Tie columns, glazing, floor boxes, visible power/data, controls, access panels and other fixed elements to two stable references and a photograph.
-
Separate case size from operating space
Measure existing furniture, then record chair pullback, open drawers and doors, sit-stand travel, monitor arms and service access as separate envelopes.
-
Label evidence and exceptions
Assign IDs to sketches, walls, openings, route segments and photos; mark measured, document-derived, provided, assumed or inaccessible conditions visibly.
-
Run second-person QA
Have another person reconstruct the room and route, investigate discrepancies and state whether the package supports concept planning, quote validation or final coordination.
Measure the room and delivery route in one controlled sequence
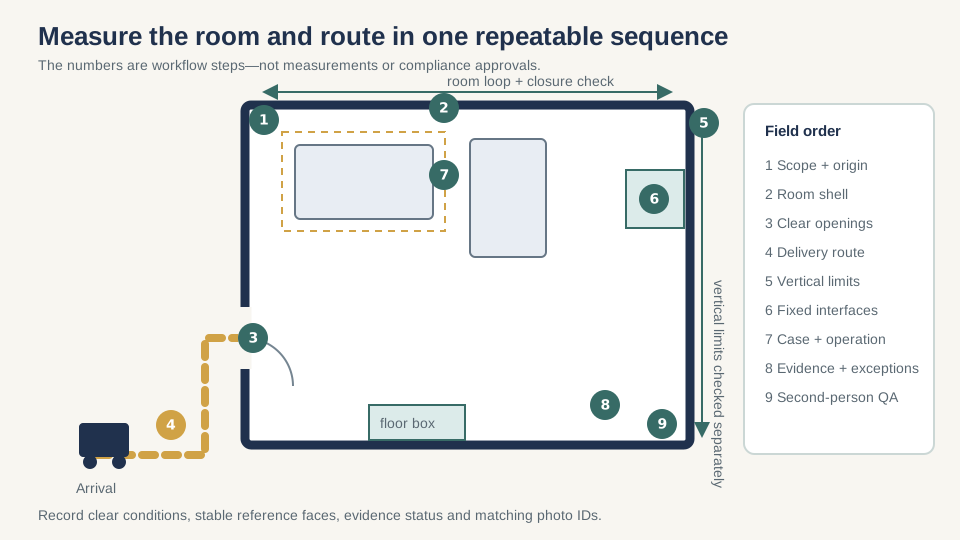
A useful office furniture survey is a traceable record of what was measured, where it was measured and what remains uncertain. It is not a code survey, structural assessment or furniture layout. GSA's workstation purchasing guide illustrates why the distinction matters: systems furniture is assembled from many product-specific parts, and buyers should describe footprint, project, electrical/data, building, delivery and installation requirements rather than treating a catalog image as the design. Your field packet supplies verified site inputs; the selected product and responsible professionals still determine the solution. [1]
Put these items in the measuring packet
- Project, building, floor, room and survey date, plus the names and roles of the people present
- Current base plan or a blank field sketch with a revision or issue date
- A measurement convention stating reference faces, units, rounding and how clear openings are recorded
- A room schedule, route log, opening schedule, fixed-condition log and existing-furniture record
- A numbered photo log tied to room, wall, opening and route identifiers
- An assumptions and exceptions list for inaccessible, concealed, occupied or unverified conditions
- A second-person review block with questions, corrections and release status
Set the scope, reference points and measurement convention
Before measuring, define the decision the survey must support. A preliminary blocking plan needs different confidence from a release drawing. List included rooms, excluded rooms, the route limits, existing items to remain, known furniture families and the latest architectural or furniture plan available. Mark whether each value is measured, provided by another party, taken from a document, calculated or assumed. This prevents an old drawing dimension from being mistaken for a field observation.
| Field | Record | Why it matters |
|---|---|---|
| Reference origin | Named wall intersection, grid line, column line or other stable point | Allows dimensions from separate visits to be compared |
| Measurement face | Finished face, structural face, centerline or clear opening | Prevents a nominal wall or door size from replacing usable space |
| Units and precision | Inches and feet-inches or metric, with a stated rounding rule | Avoids mixed-unit and false-precision errors |
| Evidence status | Measured, document, provided, calculated, assumed or not accessible | Shows which values need confirmation before release |
| Room orientation | North arrow or a clear plan orientation plus wall IDs | Keeps photos, elevations and notes aligned |
| Revision control | Survey date, source drawing date, file name and revision | Prevents superseded inputs from silently controlling the plan |
-
Walk the scope
Confirm the named rooms, route, building access and areas that cannot be entered before recording detailed values.
-
Establish the origin
Choose repeatable reference points and label walls, openings, columns, route segments and photographs.
-
Test the convention
Have a second person interpret three sample dimensions from the blank form; revise labels that could be read two ways.
Measure the room shell and every usable opening
Measure the closed room loop from the same finished faces, then add diagonals or independent checks that can reveal an out-of-square condition. Record wall jogs, recesses, columns, glazing, base projections, radiators, casework and other fixed elements. At each door or gate, distinguish leaf size from the clear opening available in the condition that will actually be used. Photograph hinges, closers, thresholds, handles and nearby obstructions instead of assuming the nominal door label describes the furniture path.
Room-shell record
- Overall length and width plus intermediate dimensions that locate every change in wall direction
- Finished floor-to-ceiling height and any lower soffits, beams, lights, diffusers, sprinklers or suspended elements
- Column size and location from two reference faces; do not locate a column from one floating dimension
- Door, gate and pass-through clear width and height, threshold, approach and actual opening direction
- Windows, sills, shades, wall controls, thermostats, fire devices, access panels and fixed displays
- Floor transitions, slopes, raised areas, pits, uneven surfaces and finish changes relevant to furniture placement
- Baseboard, wall protection, trim or other projections that change the usable furniture envelope
- A closure check or diagonal comparison, with the discrepancy recorded rather than forced to zero
Survey the complete truck-to-room route
Start at the actual arrival condition—not at the destination door. Record the vehicle or loading interface, curb or dock transition, check-in point, staging location, freight-elevator path, corridors, doors, turns and final room entry. The limiting condition may be a short landing, an offset pair of doors, a low ceiling device, a turn that cannot accept a long package or a loading rule rather than the narrowest straight opening. Compare the route with packaged-product information and the approved handling plan; do not infer a method from assembled furniture dimensions.
| Route element | Measure or obtain | Record the decision owner |
|---|---|---|
| Vehicle and dock | Approach, bay, dock or grade height, door, platform, weather exposure and appointment limits | Property, carrier or logistics lead |
| Door or gate | Clear width and height, threshold, closer, opening angle, security and adjacent landing | Property and project team |
| Corridor and turn | Clear width, segment length, ceiling limit, projections, intersection geometry and temporary obstructions | Planner, installer and property reviewer |
| Elevator | Cab clear dimensions, door clear opening, controls, protection, reservation and rated capacity from the responsible source | Building management and approved handling party |
| Stair or level change | Geometry, landings, rails, doors and restriction status | Property and responsible safety or handling party |
| Temporary staging | Usable footprint, duration, load decision, security, protection and maintained routes | Property and project release owner |
Where OSHA's material-handling rule applies, passageways must provide sufficient clearance for the equipment used and remain clear, while stored material must not create a hazard. A furniture survey should therefore document route and staging constraints, but it should not choose lifting equipment, prescribe stacking or certify capacity. Those decisions remain with the employer and qualified parties responsible for the work. [3]
Record fixed elements and infrastructure interfaces
Locate what the furniture must respect, connect to, expose or avoid. Record floor boxes, poke-throughs, wall outlets, columns, perimeter feeds, data outlets, thermostats, return-air paths, diffusers, access panels, lighting controls and other visible interfaces. A location record is not an electrical, data, mechanical or fire-protection design. Mark service identity as unknown unless labels and responsible project information confirm it, and never open equipment or covers merely to complete a furniture survey.
| Interface | Field record | Required follow-up |
|---|---|---|
| Power and data | Visible location, orientation, label, cover, height and photo | Responsible electrical, data and furniture parties verify source, capacity, compatibility and connection scope |
| Ceiling and HVAC | Ceiling type and height, diffusers, returns, controls, access and visible obstructions | Responsible building and design parties review performance and access |
| Life-safety elements | Visible device or cabinet location and access zone shown on current plan | Responsible fire, building and design reviewers determine required clearances and changes |
| Floor, glazing and shades | Finish, transitions, sill, mullions, controls and visible conditions | Responsible parties verify capacity, protection, operation and required access |
Record existing furniture separately from its operating envelope
The physical case size is only one layer. A chair rolls back; a file drawer projects; a hinged door swings; a sit-stand surface moves vertically; a monitor arm, cable, visitor chair or mobile pedestal can cross the nominal footprint. Record existing items by identity and measured outside dimensions, then draw the operating envelope and clearance assumption as separate plan information. This makes conflicts visible without claiming that every user needs the same movement area.
Existing-furniture field record
- Unique item or workstation ID tied to the inventory record
- Manufacturer, family, model, label or other identification visible without disassembly
- Overall width, depth and height plus orientation and handedness
- Panels, surfaces, supports, storage, screens, doors and accessories present
- Powered, unpowered or unknown status; visible service interfaces only
- Fixed, freestanding, wall-supported, connected, anchored or unknown condition
- Open drawer, door, chair and adjustable-surface envelopes recorded separately
- Condition, missing labels, inaccessible faces, concealed dimensions and assumptions
- Photo numbers and current disposition
Build a photo and field-note log that another person can follow
Take context photographs before close-ups. A useful sequence shows the room entrance, each wall in order, fixed elements, the route looking in both directions and every critical opening or turn. Include a visible, safe reference scale where appropriate, but keep the written dimension controlling. Rename photographs or map them immediately; a folder of time-stamped images without room and direction labels becomes difficult to audit after the site changes.
| Evidence item | Minimum label | Useful note |
|---|---|---|
| Room overview | Room ID, view direction and sequence | State whether furniture or people concealed any boundary |
| Opening | Opening ID, approach side and clear-condition dimension | Show threshold, closer, adjacent wall and obstruction |
| Route turn | Route segment IDs before and after the turn | Show ceiling and floor conditions as well as plan geometry |
| Fixed interface | Wall or grid reference, elevation and device label if visible | Mark service as unknown when the label is absent or unclear |
| Exception | Question ID and affected dimension or decision | Name the person or document needed to resolve it |
Field-note quality check before leaving
- Every sketch dimension has arrowheads or clear endpoints and readable units
- Every critical opening and route transition has a photo and identifier
- Every room loop has an independent check or a recorded reason why it does not
- Assumed, provided, document-derived and inaccessible conditions are visibly marked
- Open questions have an owner, needed evidence and decision deadline
- Confidential material was excluded from photographs
Run second-person QA and issue a drawing-ready handoff
The reviewer should reconstruct the room and route without relying on the surveyor's memory. Compare room loops, opening locations, diagonals, repeated dimensions, plan scale and photographs. Investigate material discrepancies; do not average them away. Then separate verified geometry from unresolved conditions and from decisions owned by property, accessibility, design, electrical, data, structural, fire or installation parties.
-
Check identity and revision
Confirm building, floor, room, date, source drawing, units, orientation and surveyor before reviewing geometry.
-
Rebuild the room loop
Verify that chained dimensions, overall dimensions, diagonals and fixed-element offsets describe one coherent condition.
-
Trace the route
Follow every segment and transition from arrival to room, confirming that openings, turns, levels and evidence are complete.
-
Resolve or isolate conflicts
Re-measure, obtain responsible information or mark a bounded hold. Never hide a conflict inside a clean drawing.
-
Create the handoff package
Issue the field sketch, dimension and opening schedules, route log, photo index, existing-furniture record and unresolved-condition register together.
-
Set release status
State whether the package supports concept planning, quote validation or final coordination, and list the approvals it does not provide.
Drawing-ready handoff contents
- Dimensioned room shell with stable references, orientation, units and evidence status
- Opening and route schedules tied to photographs and packaged-product questions
- Fixed-element and infrastructure interface locations with discipline follow-ups
- Existing-furniture dimensions, identity, operational envelopes and disposition status
- Assumptions, discrepancies, inaccessible conditions, responsible owners and due dates
- Reviewer name, review date, corrections made and bounded release status
- Re-verification after construction, access, product or layout changes
Frequently asked questions
Should I measure the room or the furniture first?
Define the project scope first, then record the room and route independently from the existing or proposed furniture. Keeping those records separate lets the planner compare multiple products and exposes where an operating envelope—not the case dimension—creates a conflict.
Is a floor plan enough to order office furniture?
Usually not by itself. Confirm its revision, scale, measurement faces and field accuracy, then add route, opening, fixed-interface, existing-condition and project-specific product information. GSA's workstation guide emphasizes that space plans and furniture designs are not merely minimum technical requirements. [1]
What is the most commonly missed delivery measurement?
There is no universal single answer. Teams often focus on straight door width and miss turns, offset openings, elevator geometry, thresholds, ceiling obstructions, staging or packaged-product orientation. Survey the route as connected segments and transitions.
Can I use a phone measurement app?
Use any device only within a documented method appropriate to the required confidence. Validate critical dimensions with an independent check, preserve the start and end faces, and do not let an app's precision substitute for calibration, access or review.
Does this checklist confirm ADA compliance?
No. It records geometry and visible conditions. The Access Board explains that scoping and technical provisions work together and that accessible routes include walking surfaces, doors, turns and vertical-access components. The responsible project reviewer must determine applicability and compliance. [2]
When should the site be remeasured?
Recheck whenever construction, finishes, doors, ceiling elements, building access, staging, furniture product, packaging or approved layout changes could affect a critical dimension. Record the trigger and the newly verified revision rather than overwriting the earlier evidence.
Sources and limitations
This U.S.-focused checklist organizes field information; it does not certify the site, product, building systems, handling, installation or compliance.
The current contract, product documents, approved drawings, property rules, employer procedures and qualified project reviews control the work. Federal guidance and one manufacturer's practices are used as bounded planning references, not as universal specifications. Recheck every critical condition after a material site, route, product or drawing change.
- U.S. General Services Administration: The Beginner's Guide: Do's and Don'ts of Buying Office Workstations
- U.S. Access Board: Guide to the ADA Accessibility Standards: Chapter 4—Accessible Routes
- Occupational Safety and Health Administration: 29 CFR 1910.176: Handling Materials—General
- Haworth: Installation Best Practices